Inspecting for Damage
It’s a good idea to inspect and repair your roof in autumn, before the hard weather hits. Then examine the roof again in spring to assess whatever damage may have occurred during the winter. If you discover problems, make the necessary repairs.

Inspecting from inside.
Begin an inspection in the attic, using a strong flashlight, a thin screwdriver, a knife, and a piece of chalk to examine the ridge beam, rafters, and sheathing. Look for water stains, dark-colored areas of wet wood, moisture, and soft spots that may indicate dry rot. Mark the wet spots with chalk so you can find them easily later on.
If it’s necessary to remove fiberglass insulation batts to examine the sheathing, be sure to wear loose clothing, gloves, goggles, and a respirator for protection.
Next, turn off any lights. If you see any holes above you, drive nails or poke wire through them so they’ll be visible from the roof’s surface. (In a wood shingle roof, small shafts of light coming in at an angle indicate cracks that may swell shut when the shingles are wet.)
Inspecting from outside.
When you examine the roof from outdoors, evaluate the condition of the roof structure, surface material, flashings, eaves, and gutters.
To check the roof structure, stand back from the house and look at the lines of the ridge and rafters. The ridge line should be perfectly horizontal, and the line of the rafters, which you can assess by looking along the plane of each roof section, should be straight. If either sags, call in a professional contractor—you may have a structural problem.
Next, inspect the roof’s surface. Before climbing up on your roof, be sure to read the safety tips on page 30. If you’re at all nervous about going up on the roof, make the inspection from a ladder, using a pair of binoculars. Don’t walk on the roof any more than is absolutely necessary; you can easily cause more damage.
Inspect the flashings for rust spots and broken seals along the edges. If you have metal gutters and downspouts, look for rust spots and holes. Then examine the roof surface for signs of wear, loose or broken nails, or curled, broken, or missing shingles. Use a knife and screwdriver to test the boards along the eaves and rakes. Scrape out any damage caused by dry rot, treat with a wood preservative, and fill the holes with wood putty If the damage is extensive, replace the boards and finish them to match the existing areas.
Locating a Roof Leak
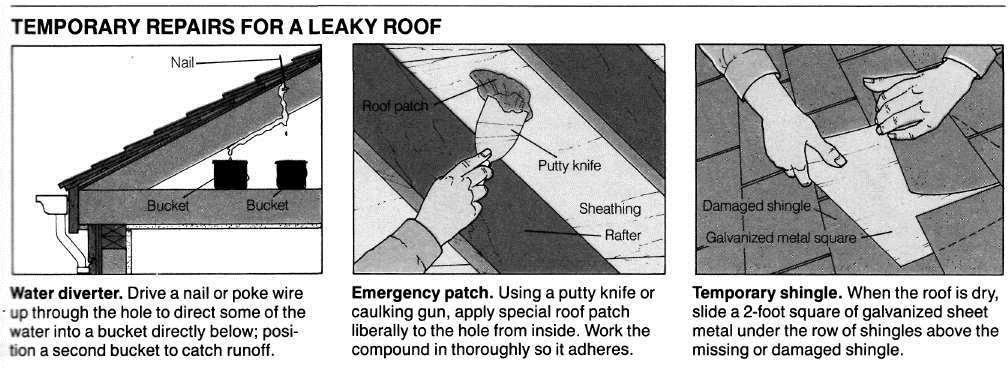
Roof leaks usually appear during storms, when you can’t make permanent repairs. But you can take some steps to temporarily divert or halt the flow of water, as shown below.
Generally leaks begin at a roof’s most vulnerable spots—at flashings, where shingles are damaged or missing, in valleys, or at eaves. Often, the water shows up far from its point of origin after working its way through layers of roofing materials and down rafters to collect in a puddle on the attic or bedroom floor.
During a storm, trace the course of water from where it’s dripping through the ceiling to where it’s coming through the roof. Drive a nail or poke wire through the hole so you can find the hole later when you get up on the roof. Once the roof is dry enough, check it thoroughly looking for weak spots that indicate a source for the leak. Keep in mind that the point where a nail or wire is poking through may be below the actual source.

